About Macro Development
Basics
KLayout supports macro programming with the Ruby language. Macros are basically ruby scripts that are executed by the integrated Ruby interpreter. Prior to version 0.22, those scripts were stored in simple text files and loaded by KLayout automatically or upon request by using the "-rm" or "-r" command-line option. Starting with version 0.22, Klayout can also read special macro files with the suffix ".lym". Those files are XML files that store the macro code along with additional information, for example the description text and certain flags. These flags tell KLayout to run the macro automatically when starting up for example. In addition, KLayout can present such macros in the "Tools" menu without having to register a specific menu extension.
Starting with version 0.22, KLayout also offers an integrated development environment (IDE) that allows to edit and debug Ruby scripts. It offers a simple debugger with the ability to set breakpoints and to interactively interact with the current context while in a breakpoint. It replaces the former "RBA console" which was basically just a Ruby shell.
KLayout defines certain folders which it scans for macro files. Each directory is scanned recursively. It can contain subdirectories with new macros and can also contain support files such as images or addition ruby modules. That allows to organize macros in modules where each module contains the macro file and supporting files. KLayout looks for macros in the following places:
- The "macros" folder in the installation path. The installation path is where the KLayout binary resides. KLayout cannot modify macros that are stored in that path. This is the "global" repository. Usually that repository is shared between all users. An administrator can use this location to install macros globally.
- The "macros" folder in KLayout's user specific application folder. On Unix that is "~/.klayout/macros". This is the "local" repository. Any user can store his or her own macros here.
- In addition, further repositories can be given on the command line with the "-j" option. This allows to add development repositories which are under configuration management and contain the latest code for the macros. Those repositories are called "project" repositories.
You can also add custom places using the "Add Location" entry from the macro tree's context menu (right mouse click). These locations will be added to the tree. That setting is stored in the setup, so it will be available again when KLayout is started again. You can remove places again by using "Remove Location" from the macro tree's context menu.
KLayout will scan these places for files and present them in the macro development IDE's repository browser. You can edit the files and their properties and run the macros from the IDE. KLayout's IDE supports these file types:
- ".lym": generic KLayout macros.
- ".rb": plain Ruby files. Such files can be imported into KLayout macros by Ruby's "require" or "load" method.
- ".txt": text files for documentation for example.
The macro development IDE
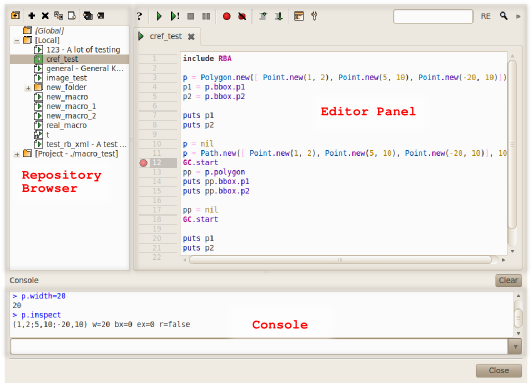
The macro development IDE consists of three parts: the repository browser, the editor panel and the console. The repository browser allows to browse the macro repositories and to add new files, to move files, to delete files, to import plain ruby files as KLayout macros and to rename files. In the editor panel, the macro or other files can be edited, breakpoints can be set and the macro can be run. In the console, Ruby expressions can be entered and evaluated. This also works while KLayout is in a breakpoint. That feature allows to evaluate expressions in the current context and to modify variables. The console also shows the output of the Ruby scripts when they are run in the context of the IDE.
The following image shows the IDE with the three main parts:
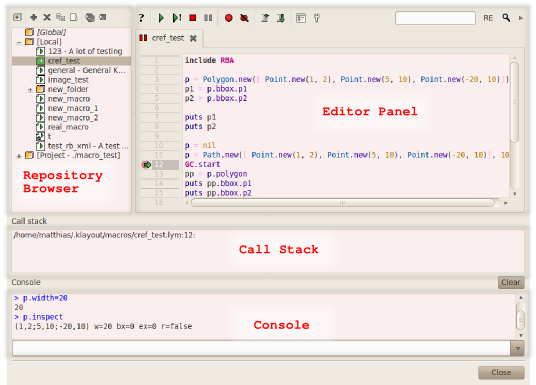
When the debugger enters a breakpoint, the IDE also shows the call stack. By clicking on an entry in the call stack panel, the editor will open the respective file and position the cursor at that line. The following image shows the IDE in breakpoint mode:
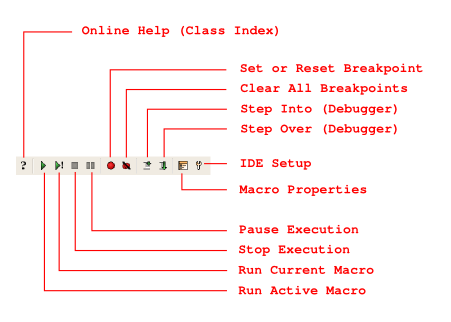
The editor panel features a toolbar with several tool buttons. The following image shows the toolbar and the buttons with their function:
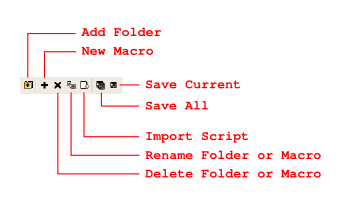
Also the repository browser features a toolbar with more tool buttons. The following image shows that toolbar and the buttons with their function:
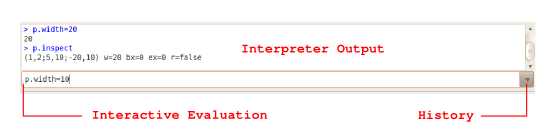
Finally the console panel allows to interactively execute Ruby expressions. The following image shows the console elements and their function:
Basic tasks
Create a new macro
To create a new macro, choose the branch in the repository browser where you want to create the macro. Press the "+" button above the repository browser. A dialog will come up that allows to select a template. A template is basically the initial content of the macro plus some default settings. After the macro is created, the new entry is highlighted and the name can be edited to the desired new name.
Edit the macro
After the macro has been created, it is shown in the editor window. Other macros or files can be opened in the editor by double-clicking at their name. Depending on the type of file, the editor provides some basic syntax highlighting. Each file is opened in a separate tab. The tabs can be closed by clicking at the "x" button in the tab.
To save the current edits to the files, press the "Save all files" or the "Save current file" button in the repository browser.
Search and search & replace is available in the editor panel in the search box. The search a text, enter the text in the search box and hit Return. Use the "Find next" button to find the next occurrence of the text. Click on the "RE" button to enable regular expressions in the search function. To enable "Replace" mode, open the replace text edit box by clicking on the little arrow right to the search tools. Enter the text to replace the search text into the edit box and use "Replace all" to replace all occurrences or use "Replace and search" to replace the current occurrence and highlight the next one.
Run the macro
To run the macro, press the "Run current script" or the "Run script from the current tab" button in the editor panel. "Run current" will run the script that was run the last time, irregardless if the script is the one currently shown in the editor panel. That way, it is possible to run the same script while editing support files for example. "Run script from the current tab" will always run the script from the current tab.
When the macro runs, output will be sent to the console below the editor panel. Breakpoints can be set or reset with the "Set breakpoint" button or the F9 key in the editor panel. Go to the line where you want to change the breakpoint and use "Set breakpoint" to set or reset the breakpoint on the current line. All breakpoints can be cleared with the "Clear all breakpoints" button.
While the macro is running or in a breakpoint, the execution can be aborted with the "Stop script" button. Execution can be interrupted with the "Pause script" button. In that case, KLayout will interrupt the script execution at the current position.
When in a breakpoint, single-line step-by-step is supported with the "Step into" button or the F11 key. Stepping over a block or procedure call is supported with the "Step over" button or the F10 key. Please note that "Step over" will also step over blocks.
While KLayout has stopped the execution of the script, the console can be used to examine variables in the current context or to modify their values. Ruby expressions entered into the console are simply executed in the current context.
Work with the repository browser
With the repository browser, you can add new folders using the "New folder" button. Before you do so, select the branch of the repository where you want to create the new folder. The new folder will be highlighted and the name can be edited.
To delete files and folders, select the file or folder in the browser and click the "Delete" button (the "x"). Caution: deleting a file or folder cannot be undone currently.
To rename a file or folder, select the entry in the browser and click on the "Rename" button and enter the new name. To move files or folder, simply drag and drop them to the desired target location.
Pain ruby scripts can be imported into the repository as KLayout macro files. Select the branch where you want to import the files in the repository browser, click on the "Import" button and select the file to import. ".rbm" files will automatically be set to "auto-run".
Configure macros
A macro can be configured in several ways:
- Description: a macro can be given a description text. This text is shown in the repository browser and in the menu if a macro a configured to be shown in the menu.
- Version: the version will be used in a later stage to check dependencies between packages. Currently the version is not used. When used, enter a string of the form "v0.v1.v2" where v0 is the major version, v1 the minor version and v2 the patch. For example: "1.7.1".
- Prolog and Epilog: these are statements which are executed before the script is started and after the script has been run respectively.
- Run on start-up: if this flag is set, the macro is automatically run when KLayout starts. This feature is required for macros defining libraries for example.
- Show in menu: with this flag, KLayout will show the macro in the "Tools" menu in the "Macros" sub-menu. That is a simple way to run macros outside the IDE.
- Bind to a key: with key binding, a macro can be run when a certain key combination is pressed. That is another way to run a macro outside the IDE.
The macro properties can be edited using the "Edit properties" button in the editor panel.
Migrating code
Ruby code written for the previous system can be imported into the macro management system of KLayout 0.22 using the "Import" function from the repository browser toolbar. ".rbm" files are marked as "autorun" in order to emulate the behavior of KLayout 0.21 and previous versions. ".rb" files are converted into KLayout macros without any further assumption. ".rb" files can also simply be copied into the macro directories. However, such files are regarded as secondary sources in KLayout. Typically those are files that are loaded by other macros. Importing a file makes code a primary source (".lym" file) with enhanced capabilities.
After importing the code the macro can be attached to a menu entry by setting "Show in menu" on the properties page. It is also possible to assign keyboard shortcuts. If either the menu item is selected or the key specified in the shortcut is pressed, the macro is executed.
This feature is more convenient to use than the scheme used previously. Until KLayout 0.22 it was only possible to register a macro with a specific menu entry by performing the registration in the code. The disadvantage of this approach is that when the macro code is re-executed, the menu item is registered again and appears in the menu twice. It is therefore more convenient to remove the menu registration code and let KLayout register the macro in the menu by setting the menu binding properties accordingly.
Hints
It is worth noting, that a macro will run considerable slower when the IDE is opened. That is because the IDE has to trace the macro execution in order to catch breakpoints and to keep the user interface alive. Only with the IDE however it is possible to stop a macro that is caught in an endless loop.
The editor and IDE can be configured using the "Setup" button in the editor panel. That dialog allows to configure fonts and colors used in the editor. It also allows to configure the behavior of the debugger in some respects.
The documentation of the Ruby classes exposed by KLayout is available in KLayout's online help system here.